概述
iOS 和 Android
的原生开发模式是命令式编程模式。命令式编程要求开发者一步步描述整个构建过程,从而引导程序去构建用户界面。
Flutter
则采用了声明式编程模式,框架隐藏了具体的构建过程,开发者只需要声明状态,框架会自动构建用户界面。这也就意味着
Flutter 构建的用户界面就是当前的状态。
状态管理
App
在运行中总是会更新用户界面,因此我们需要对状态进行有效的管理。状态管理本质上就是
如何解决状态读/写的问题 。对此,我们将从两个方面去评估状态管理方案:
此外,根据 Flutter 原生支持的情况,我们将 Flutter
状态管理方案分为两类:
Flutter 内置的状态管理方案 基于 Pub 的状态管理方案
下文,我们将以 Flutter 官方的计数器例子来介绍 Flutter
中的状态管理方案,并逐步进行优化。
关于本文涉及的源码,见【Demo
传送门】 。
Flutter 内置的状态管理方案
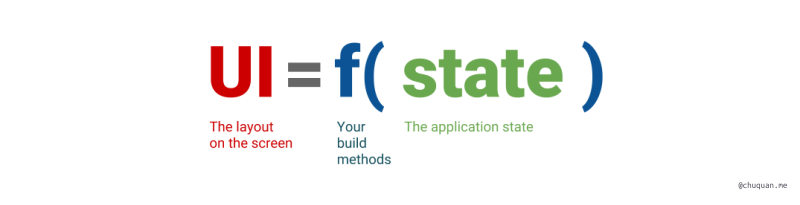
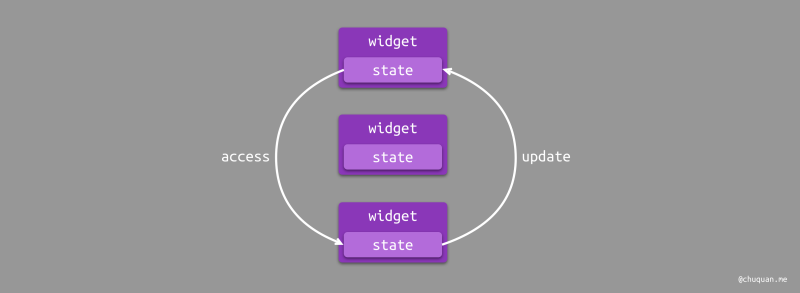
直接访问 + 直接更新
Flutter 模板工程就是【直接访问 +
直接更新】的状态管理方案。这种方案的状态访问/更新示意图如下所示。
很显然,【直接访问 + 直接更新】方案只适合于在单个
StatefulWidget 中进行状态管理。那么对于多层级的 Widget
结构该如何进行状态管理呢?
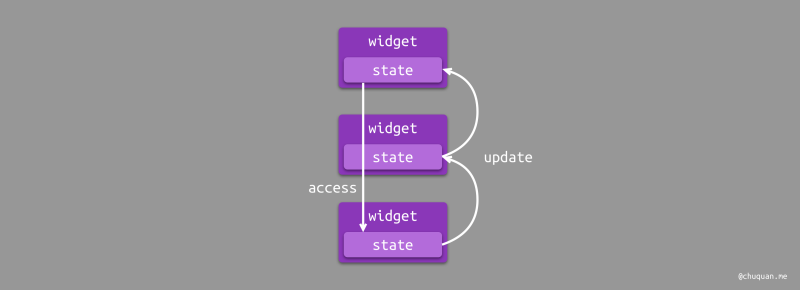
状态传递 + 闭包传递
对于多层级的 Widget 结构,状态是无法直接访问和更新的。因为 Widget 和
State 是分离的,并且 State 一般都是私有的,所以子 Widget
是无法直接访问/更新父 Widget 的 State。
对于这种情况,最直观的状态管理方案就是:【状态传递 +
闭包传递】。对于状态访问,父 Widget 在创建子 Widget 时就将状态传递给子
Widget;对于状态更新,父 Widget 将更新状态的操作封装在闭包中,传递给子
Widget。
这里存在一个问题:当 Widget 树层级比较深时,如果中间有些 Widget
并不需要访问或更新父 Widget 的状态时,这些中间 Widget
仍然需要进行辅助传递。很显然,这种方案在 Widget
树层级较深时,效率比较低,只适合于较浅的 Widget 树层级。
状态传递 + Notification
那么如何优化多层级 Widget
树结构下的状态管理方案呢?我们首先从状态更新方面进行优化。
【状态传递 + Notification】方案采用 Notification
定向地优化了状态更新的方式。
通知(Notification)是 Flutter 中一个重要的机制,在 Widget
树种,每个节点都可以分发通知,通知会沿着当前节点向上传递,所有父节点都可以通过
NotificationListener 来监听通知。Flutter
中将这种由子向父的传递通知的机制称为
通知冒泡 (Notification
Bubbling)。通知冒泡和用户触摸事件冒泡是相似的,但有一点不同:通知冒泡可以中止,而用户触摸事件无法中止 。
下图所示为这种方案的状态访问/更新示意图。
具体的实现源码如下所示:
1 2 3 4 5 6 7 8 9 10 11 12 13 14 15 16 17 18 19 20 21 22 23 24 25 26 27 28 29 30 31 32 33 34 35 36 37 38 39 40 41 42 43 44 45 46 47 48 class _PassStateNotificationDemoPageState extends State <PassStateNotificationDemoPage > int _counter = 0 ; void _incrementCounter() { setState(() { _counter++; }); } @override Widget build(BuildContext context) { return NotificationListener<IncrementNotification>( onNotification: (notification) { setState(() { _incrementCounter(); }); return true ; }, child: Scaffold( ... ), ); } } class _IncrementButton extends StatelessWidget int counter = 0 ; _IncrementButton(this .counter); @override Widget build(BuildContext context) { return GestureDetector( onTap: () => IncrementNotification("加一操作" ).dispatch(context), child: ...) ); } } class IncrementNotification extends Notification final String msg; IncrementNotification(this .msg); }
【传递传递 +
Notification】方案定向优化了状态的更新,那么如何进一步优化状态的访问呢?
【InheritedWidget + Notification】方案采用
InhertiedWidget 实现了在多层级 Widget
树中直接访问状态的能力。
InheritedWidget 是 Flutter
中非常重要的一个功能型组件,其提供了一种数据在 Widget
树中从上到下传递、共享的方式。这与 Notification
的传递方向正好相反。我们在父 Widget 中通过 InheritedWidget
共享一个数据,那么任意子 Widget 都能够直接获取到共享的数据。
下图所示为这种方案的状态访问/更新示意图。
具体的源码实现如下所示:
1 2 3 4 5 6 7 8 9 10 11 12 13 14 15 16 17 18 19 20 21 22 23 24 25 26 27 28 29 30 31 32 33 34 35 36 37 38 39 40 41 42 43 44 45 46 47 48 49 50 51 52 53 54 55 56 57 58 59 60 61 62 63 64 65 66 class _InheritedWidgetNotificationDemoPageState extends State <InheritedWidgetNotificationDemoPage > int _counter = 0 ; void _incrementCounter() { setState(() { _counter++; }); } @override Widget build(BuildContext context) { return CounterInheritedWidget( counter: _counter, child: NotificationListener<IncrementNotification>( onNotification: (notification) { setState(() { _incrementCounter(); }); return true ; }, child: Scaffold( ... ), ), ), ), ); } } class _IncrementButton extends StatelessWidget _IncrementButton(); @override Widget build(BuildContext context) { final counter = CounterInheritedWidget.of(context).counter; return GestureDetector( onTap: () => IncrementNotification("加一" ).dispatch(context), child: ... ); } } class CounterInheritedWidget extends InheritedWidget final int counter; CounterInheritedWidget({@required this .counter, Widget child}) : super (child: child); static CounterInheritedWidget of(BuildContext context) { return context.dependOnInheritedWidgetOfExactType<CounterInheritedWidget>(); } @override bool updateShouldNotify(CounterInheritedWidget old) { return old.counter != counter; } }
虽然【InheritedWidget +
Notification】方案在状态访问和状态更新方面都进行了优化,但是从其状态管理示意图上看,状态的更新仍然具有优化空间。
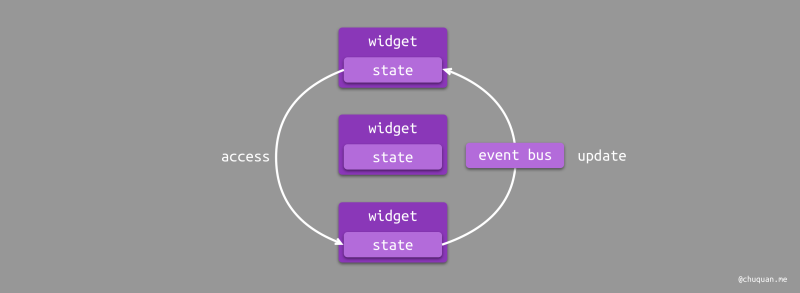
【InheritedWidget + EventBus】方案则采用了
事件总线 (Event Bus)的方式管理状态更新。
事件总线是 Flutter
中的一种全局广播机制,可以实现跨页面事件通知。事件总线通常是一种订阅者模式,其包含发布者和订阅者两种角色。
【InheritedWidget + EventBus】方案将子 Widget 作为发布者,父 Widget
作为订阅者。当子 Widget 进行状态更新时,则发出事件,父 Widget
监听到事件后进行状态更新。
下图所示为这种方案的状态访问/更新示意图。
具体的源码实现如下所示:
1 2 3 4 5 6 7 8 9 10 11 12 13 14 15 16 17 18 19 20 21 22 23 24 25 26 27 28 29 30 31 32 33 34 35 36 37 38 39 40 41 class _InheritedWidgetEventBusDemoPageState extends State <InheritedWidgetEventBusDemoPage > int _counter = 0 ; void _incrementCounter() { setState(() { _counter++; }); } @override void initState() { super .initState(); bus.on (EventBus.incrementEvent, (_) { _incrementCounter(); }); } @override void dispose() { bus.off(EventBus.incrementEvent); super .dispose(); } ... } class _IncrementButton extends StatelessWidget _IncrementButton(); @override Widget build(BuildContext context) { final counter = CounterInheritedWidget.of(context).counter; return GestureDetector( onTap: () => bus.emit(EventBus.incrementEvent), child: ... ); } }
两种方案的对比
【InheritedWidget + Notification】和【InheritedWidget +
EventBus】的区别主要在于状态更新。两者对于状态的更新其实并没有达到最佳状态,都是通过一种间接的方式实现的。
相比而言,事件总线是基于全局,逻辑难以进行收敛,并且还要管理监听事件、取消订阅。从这方面而言,【InheritedWidget
+ Notification】方案更优。
从状态管理示意图而言,显然【InheritedWidget +
Notification】还有进一步的优化空间。这里,我们可能会想:状态能否直接提供更新方法,当子
Widget 获取到状态后,直接调用状态的更新方法呢?
对此,官方推荐了一套基于第三方 Pub 的 Provider 状态管理方案。
基于 Pub 的状态管理方案
Provider
【Provider】的本质是 基于 InheritedWidget 和
ChangeNotifier
进行了封装 。此外,使用缓存提升了性能,避免不必要的重绘。
下图所示为这种方案的状态访问/更新示意图。
具体的源码实现如下所示:
1 2 3 4 5 6 7 8 9 10 11 12 13 14 15 16 17 18 19 20 21 22 23 24 25 26 27 28 29 30 31 32 33 34 35 36 37 38 39 40 41 42 43 44 45 46 47 48 49 50 51 52 53 54 55 class _ProviderDemoPageState extends State <ProviderDemoPage > @override Widget build(BuildContext context) { return ChangeNotifierProvider<CounterProviderState>( create: (_) => CounterProviderState(), child: Scaffold( appBar: AppBar( title: Text(widget.title), ), body: Center( child: Column( mainAxisAlignment: MainAxisAlignment.center, children: <Widget>[ Text( 'You have pushed the button this many times:' , ), Consumer<CounterProviderState>(builder: (context, counter, _) => Text("${counter.value} " , style: Theme.of(context).textTheme.display1)), _IncrementButton(), ], ), ), ), ); } } class _IncrementButton extends StatelessWidget _IncrementButton(); @override Widget build(BuildContext context) { final _counter = Provider.of<CounterProviderState>(context); return GestureDetector( onTap: () => _counter.incrementCounter(), child: ... ); } } class CounterProviderState with ChangeNotifier int _counter = 0 ; int get value => _counter; void incrementCounter() { _counter++; notifyListeners(); } }
Flutter 社区早期使用的 Scoped Model 方案与 Provider
的实现原理基本是一致的。
Redux
对于声明式(响应式)编程中的状态管理,Redux
是一种常见的状态管理方案。【Redux】方案的状态管理示意图与【Provider】方案基本上是一致的。
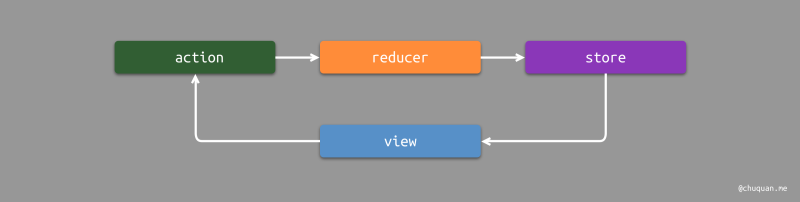
在这个基础上,Redux
对于状态更新的过程进行了进一步的细分和规划 ,使得其数据的流动过程如下所示。
所有的状态都存储在 Store 中。一般会把 Store 放在 App 顶层。
View 获取 Store 中存储的状态。
当事件发生时,发出一个 action。
Reducer 接收到 action,遍历 action 表,找到匹配的 action,根据
action 生成新的状态存储到 Store 中。
Store 存储新状态后,通知依赖该状态的 view 更新。
一个 Store 存储多个状态,适合用于全局状态管理。
具体的实现源码如下所示。
1 2 3 4 5 6 7 8 9 10 11 12 13 14 15 16 17 18 19 20 21 22 23 24 25 26 27 28 29 30 31 32 33 34 35 36 37 38 39 40 41 42 43 44 45 46 47 48 49 50 51 52 53 54 55 56 57 58 59 60 61 62 63 64 65 66 67 68 69 70 71 72 73 74 75 76 77 78 79 80 81 82 83 84 85 class _ReduxDemoPageState extends State <ReduxDemoPage > final store = Store<CounterReduxState>(reducer, initialState: CounterReduxState.initState()); @override Widget build(BuildContext context) { return StoreProvider<CounterReduxState>( store: store, child: Scaffold( appBar: AppBar( title: Text(widget.title), ), body: Center( child: Column( mainAxisAlignment: MainAxisAlignment.center, children: <Widget>[ Text( 'You have pushed the button this many times:' , ), StoreConnector<CounterReduxState, int >( converter: (store) => store.state.value, builder: (context, count) { return Text("$count " , style: Theme.of(context).textTheme.display1); }, ), _IncrementButton(), ], ), ), ), ); } } class _IncrementButton extends StatelessWidget _IncrementButton(); @override Widget build(BuildContext context) { return StoreConnector<CounterReduxState, VoidCallback>( converter: (store) { return () => store.dispatch(Action.increment); }, builder: (context, callback) { return GestureDetector( onTap: callback, child: StoreConnector<CounterReduxState, int >( converter: (store) => store.state.value, builder: (context, count) { return ...; }, ) ); }, ); } } class CounterReduxState int _counter = 0 ; int get value => _counter; CounterReduxState(this ._counter); CounterReduxState.initState() { _counter = 0 ; } } enum Action{ increment } CounterReduxState reducer(CounterReduxState state, dynamic action) { if (action == Action.increment) { return CounterReduxState(state.value + 1 ); } return state; }
BLoC
【BLoC】方案是谷歌的两位工程师 Paolo Soares 和 Cong Hui
提出的一种状态管理方案,其状态管理示意图同样与【Provider】方案是一致的。
【BLoC】方案的底层实现与【Provider】是非常相似的,也是基于
InheritedWidget
进行状态访问,并且对状态进行了封装,从而提供直接更新状态的方法。
但是,BLoC 的核心思想是
基于流来管理数据 ,并且将业务逻辑均放在 BLoC
中进行,从而实现视图与业务的分离。
BLoC 使用 Sink 作为输入,使用 Stream 作为输出。
BLoC 内部会对输入进行转换,产生特定的输出。
外部使用 StreamBuilder 监听 BLoC 的输出(即状态)。
具体的实现源码如下所示。
1 2 3 4 5 6 7 8 9 10 11 12 13 14 15 16 17 18 19 20 21 22 23 24 25 26 27 28 29 30 31 32 33 34 35 36 37 38 39 40 41 42 43 44 45 46 47 48 49 50 51 52 53 54 55 56 57 58 59 60 61 62 63 64 65 66 67 68 69 70 71 72 73 74 75 76 77 78 79 80 81 82 83 class _BlocDemoPageState extends State <BlocDemoPage > final bloc = CounterBloc(); @override Widget build(BuildContext context) { return BlocProvider( bloc: bloc, child: Scaffold( appBar: AppBar( title: Text(widget.title), ), body: Center( child: Column( mainAxisAlignment: MainAxisAlignment.center, children: <Widget>[ Text( 'You have pushed the button this many times:' , ), StreamBuilder<int >(stream: bloc.value, initialData: 0 , builder: (BuildContext context, AsyncSnapshot<int > snapshot) { return Text("${snapshot.data} " , style: Theme.of(context).textTheme.display1); },), _IncrementButton(), ], ), ), ) ); } } class _IncrementButton extends StatelessWidget _IncrementButton(); @override Widget build(BuildContext context) { return GestureDetector( onTap: () => BlocProvider.of(context).increment(), child: ClipOval(child: Container(width: 50 , height: 50 , alignment: Alignment.center,color: Colors.blue, child: StreamBuilder<int >(stream: BlocProvider.of(context).value, initialData: 0 , builder: (BuildContext context, AsyncSnapshot<int > snapshot) { return Text("${snapshot.data} " , textAlign: TextAlign.center,style: TextStyle(fontSize: 24 , color: Colors.white)); },),),) ); } } class BlocProvider extends InheritedWidget final CounterBloc bloc; BlocProvider({this .bloc, Key key, Widget child}) : super (key: key, child: child); @override bool updateShouldNotify(_) => true ; static CounterBloc of(BuildContext context) => (context.inheritFromWidgetOfExactType(BlocProvider) as BlocProvider).bloc; } class CounterBloc int _counter; StreamController<int > _counterController; CounterBloc() { _counter = 0 ; _counterController = StreamController<int >.broadcast(); } Stream<int > get value => _counterController.stream; increment() { _counterController.sink.add(++_counter); } dispose() { _counterController.close(); } }
总结
一般而言,对于普通的项目来说【Provider】方案是一种非常容易理解,并且实用的状态管理方案。
对于大型的项目而言,【Redux】
有一套相对规范的状态更新流程,但是模板代码会比较多;对于重业务的项目而言,【BLoC】能够将复杂的业务内聚到
BLoC 模块中,实现业务分离。
总之,各种状态管理方案都有着各自的优缺点,这些需要我们在实践中去发现和总结,从而最终找到一种适合自己项目的状态管理方案。
参考
状态
(State) 管理参考 [译]让我来帮你理解和选择Flutter状态管理方案 Flutter状态管理
- 初探与总结 Flutter |
状态管理探索篇——Scoped Model(一) Flutter |
状态管理探索篇——Redux(二) Flutter |
状态管理探索篇——BLoC(三) 《Flutter 实战》
Dart |
什么是Stream 异步编程:使用
stream 使用 Flutter
构建响应式移动应用 Flutter入门三部曲(3)
- 数据传递/状态管理 | 掘金技术征文