GCD 简介
GCD(Grand Central Dispatch)是 Apple
开发的一个多核编程的解决方法。它主要用于优化应用程序以支持多核处理器以及其他对称多处理系统。
GCD 基本概念
GCD 主要包含两个核心概念:任务 和
队列。
任务
任务:即要在线程中执行的那段代码。GCD 将任务定义在
block 中。
任务的执行主要有两种方式:同步执行(sync) 和
异步执行(async)。两者的主要区别是:是否等待队列中的任务执行结束,是否具备开启新线程的能力。因此,根据任务的执行方式可以将任务分成两种类型:
同步任务(sync)
- 同步添加任务到指定的队列中,在添加的任务执行结束之前,会一直等待,直到队列里面的任务完成之后再继续执行。
- 只能在当前线程中执行任务,不具备开启新线程的能力。
异步任务(async)
- 异步添加任务到指定的队列中,它不会做任何等待,可以继续执行任务。
- 可以在新的线程中执行任务,具备开启新线程的能力。
注意: 异步任务(async)
虽然具有开启新线程的能力,但是并不一定开启新线程。这跟任务所指定的队列类型有关(下面会讲)。
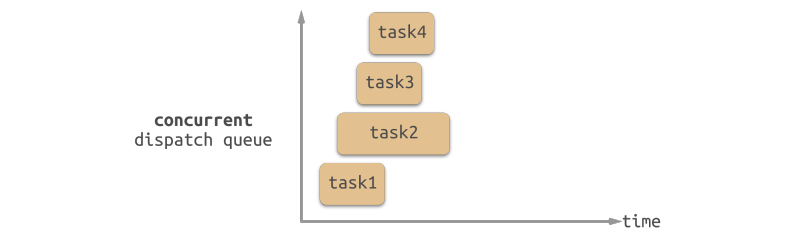
队列
队列(Dispatch
Queue):即用来存放任务的队列。队列是一种特殊的线性表,采用
FIFO(先进先出)的原则,即新任务总是被插入到队列的末尾,而读取任务的时候总是从队列的头部开始读取。每读取一个任务,则从队列中释放一个任务。队列的结构如下图所示:

在 GCD 中有两种队列:串行队列 和
并发队列。两者的主要区别是:执行顺序不同,开启线程数不同。
串行队列
- 每次只有一个任务被执行。(只开启一个线程,一个任务执行完毕后,在执行下一个任务)

并发队列
- 允许多个任务(同时)执行。(可以开启多个线程,并同时执行任务)
注意:并发队列
的并发功能只有在异步(dispatch_async)函数下才有效。
GCD 使用方法
GCD 的使用主要包含两个步骤:
- 创建一个队列(串行队列或并发队列)
- 将任务追加到任务的等待队列中,然后系统会根据任务类型执行任务(同步执行或异步执行)
队列的创建/获取
1
2
3
| dispatch_queue_t
dispatch_queue_create(const char *_Nullable label,
dispatch_queue_attr_t _Nullable attr)
|
参数说明:
label:表示队列的唯一标识符,用于 DEBUG,可为空。attr:表示队列的类型。DISPATCH_QUEUE_SERIAL
表示串行队列;DISPATCH_QUEUE_CONCURRENT 表示并发队列。
1
2
3
4
| // 串行队列的创建方法
dispatch_queue_t queue = dispatch_queue_create("me.chuquan.testQueue", DISPATCH_QUEUE_SERIAL);
// 并发队列的创建方法
dispatch_queue_t queue = dispatch_queue_create("me.chuquan.testQueue", DISPATCH_QUEUE_CONCURRENT);
|
对于串行队列,GCD 提供了一种特殊的串行队列:主队列(Main
Dispatch Queue)。
- 所有放在主队列的任务,都会在主线程执行。
- 可使用
dispatch_get_main_queue() 获取主队列。
1
2
| // 主队列的获取方法
dispatch_queue_t queue = dispatch_get_main_queue();
|
对于并发队列,GCD 默认提供了 全局并发队列(Global Dispatch
Queue)。
- 可使用
dispatch_get_global_queue
获取全局并发队列。
1
2
| // 全局并发队列的获取方法
dispatch_queue_t queue = dispatch_get_global_queue(DISPATCH_QUEUE_PRIORITY_DEFAULT, 0);
|
GCD 提供了 4 个
全局并发队列,分别对应不同的优先级。
DISPATCH_QUEUE_PRIORITY_HIGHDISPATCH_QUEUE_PRIORITY_DEFAULTDISPATCH_QUEUE_PRIORITY_LOWDISPATCH_QUEUE_PRIORITY_BACKGROUND:后台队列
任务的创建
GCD 提供了同步执行任务的创建方法 dispatch_sync
和异步执行任务创建方法 dispatch_async。
1
2
3
4
5
6
7
8
| // 同步任务创建方法
dispatch_sync(queue, ^{
// 这里放同步执行任务代码
});
// 异步任务创建方法
dispatch_async(queue, ^{
// 这里放异步执行任务代码
});
|
GCD 使用组合
GCD
有两种队列(串行队列/并发队列),两种任务(同步任务/异步任务),可以得到
4 种不同的使用组合。
- 同步任务 + 并发队列
- 异步任务 + 并发队列
- 同步任务 + 串行队列
- 异步任务 + 串行队列
实际上,前文还提到两种特殊的队列:全局并发队列、主队列。全局并发队列可作为普通并发队列使用。但是主队列比较特殊,因此又得到
2 种组合:
- 同步任务 + 主队列
- 异步任务 + 主队列
同步执行 + 并发队列
1
2
3
4
5
6
7
8
9
10
11
12
13
14
15
16
17
18
19
20
21
22
23
24
25
26
27
28
29
30
31
32
33
34
35
36
| /**
* 同步任务 + 并发队列
* 特点:在当前线程中执行任务,不会开启新线程,执行完一个任务,再执行下一个任务。
*/
- (void)syncConcurrent {
NSLog(@"currentThread---%@", [NSThread currentThread]); // 打印当前线程
NSLog(@"syncConcurrent---begin");
dispatch_queue_t queue = dispatch_queue_create("me.chuquan.testQueue", DISPATCH_QUEUE_CONCURRENT);
dispatch_sync(queue, ^{
// 追加任务1
for (int i = 0; i < 2; ++i) {
[NSThread sleepForTimeInterval:2]; // 模拟耗时操作
NSLog(@"1---%@", [NSThread currentThread]); // 打印当前线程
}
});
dispatch_sync(queue, ^{
// 追加任务2
for (int i = 0; i < 2; ++i) {
[NSThread sleepForTimeInterval:2]; // 模拟耗时操作
NSLog(@"2---%@", [NSThread currentThread]); // 打印当前线程
}
});
dispatch_sync(queue, ^{
// 追加任务3
for (int i = 0; i < 2; ++i) {
[NSThread sleepForTimeInterval:2]; // 模拟耗时操作
NSLog(@"3---%@",[NSThread currentThread]); // 打印当前线程
}
});
NSLog(@"syncConcurrent---end");
}
|

上图所示为 同步任务 + 并发队列 的工作原理。
syncConcurrent 被添加至主队列中,在主线程执行。- 同步任务被添加至并行队列,并行队列允许多任务同时执行,但由于加入的队列是同步任务,不会开启新线程,在主线程执行。
syncConcurrent 会被同步任务阻塞。
执行结果: 1
2
3
4
5
6
7
8
9
| currentThread---<NSThread: 0x60000068ee80>{number = 1, name = main}
syncConcurrent---begin
1---<NSThread: 0x60000068ee80>{number = 1, name = main}
1---<NSThread: 0x60000068ee80>{number = 1, name = main}
2---<NSThread: 0x60000068ee80>{number = 1, name = main}
2---<NSThread: 0x60000068ee80>{number = 1, name = main}
3---<NSThread: 0x60000068ee80>{number = 1, name = main}
3---<NSThread: 0x60000068ee80>{number = 1, name = main}
syncConcurrent---end
|
异步任务 + 并发队列
1
2
3
4
5
6
7
8
9
10
11
12
13
14
15
16
17
18
19
20
21
22
23
24
25
26
27
28
29
30
31
32
33
34
35
36
| /**
* 异步任务 + 并发队列
* 特点:可以开启多个线程,任务交替(同时)执行。
*/
- (void)asyncConcurrent {
NSLog(@"currentThread---%@", [NSThread currentThread]); // 打印当前线程
NSLog(@"asyncConcurrent---begin");
dispatch_queue_t queue = dispatch_queue_create("me.chuquan.testQueue", DISPATCH_QUEUE_CONCURRENT);
dispatch_async(queue, ^{
// 追加任务1
for (int i = 0; i < 2; ++i) {
[NSThread sleepForTimeInterval:2]; // 模拟耗时操作
NSLog(@"1---%@", [NSThread currentThread]); // 打印当前线程
}
});
dispatch_async(queue, ^{
// 追加任务2
for (int i = 0; i < 2; ++i) {
[NSThread sleepForTimeInterval:2]; // 模拟耗时操作
NSLog(@"2---%@", [NSThread currentThread]); // 打印当前线程
}
});
dispatch_async(queue, ^{
// 追加任务3
for (int i = 0; i < 2; ++i) {
[NSThread sleepForTimeInterval:2]; // 模拟耗时操作
NSLog(@"3---%@", [NSThread currentThread]); // 打印当前线程
}
});
NSLog(@"asyncConcurrent---end");
}
|

上图所示为 异步任务 + 并行队列 的工作原理。
asyncConcurrent 被添加至主队列中,在主线程执行。- 异步任务被添加至并行队列,并行队列允许多任务同时执行,且异步任务可以开启新线程,因此每个异步任务都能启动一个独立的线程执行。
asyncConcurrent 不会被异步任务阻塞。
执行结果 1
2
3
4
5
6
7
8
9
| currentThread---<NSThread: 0x600003e6d580>{number = 1, name = main}
asyncConcurrent---begin
asyncConcurrent---end
1---<NSThread: 0x600003ec2a80>{number = 5, name = (null)}
2---<NSThread: 0x600003ecce40>{number = 3, name = (null)}
3---<NSThread: 0x600003eccec0>{number = 4, name = (null)}
2---<NSThread: 0x600003ecce40>{number = 3, name = (null)}
3---<NSThread: 0x600003eccec0>{number = 4, name = (null)}
1---<NSThread: 0x600003ec2a80>{number = 5, name = (null)}
|
同步任务 + 串行队列
1
2
3
4
5
6
7
8
9
10
11
12
13
14
15
16
17
18
19
20
21
22
23
24
25
26
27
28
29
30
31
32
33
34
| /**
* 同步任务 + 串行队列
* 特点:不会开启新线程,在当前线程执行任务。任务是串行的,执行完一个任务,再执行下一个任务。
*/
- (void)syncSerial {
NSLog(@"currentThread---%@", [NSThread currentThread]); // 打印当前线程
NSLog(@"syncSerial---begin");
dispatch_queue_t queue = dispatch_queue_create("me.chuquan.testQueue", DISPATCH_QUEUE_SERIAL);
dispatch_sync(queue, ^{
// 追加任务1
for (int i = 0; i < 2; ++i) {
[NSThread sleepForTimeInterval:2]; // 模拟耗时操作
NSLog(@"1---%@", [NSThread currentThread]); // 打印当前线程
}
});
dispatch_sync(queue, ^{
// 追加任务2
for (int i = 0; i < 2; ++i) {
[NSThread sleepForTimeInterval:2]; // 模拟耗时操作
NSLog(@"2---%@", [NSThread currentThread]); // 打印当前线程
}
});
dispatch_sync(queue, ^{
// 追加任务3
for (int i = 0; i < 2; ++i) {
[NSThread sleepForTimeInterval:2]; // 模拟耗时操作
NSLog(@"3---%@", [NSThread currentThread]); // 打印当前线程
}
});
NSLog(@"syncSerial---end");
}
|

上图所示为 同步任务 + 串行队列 的工作原理。
syncSerial 被添加至主队列中,在主线程执行。- 同步任务被添加至串行队列,串行队列不允许多任务同时执行,因此同步任务在当前线程执行(主线程)。
syncSerial 会被同步任务阻塞。
异步任务 + 串行队列
1
2
3
4
5
6
7
8
9
10
11
12
13
14
15
16
17
18
19
20
21
22
23
24
25
26
27
28
29
30
31
32
33
34
| /**
* 异步任务 + 串行队列
* 特点:会开启新线程,但是因为任务是串行的,执行完一个任务,再执行下一个任务。
*/
- (void)asyncSerial {
NSLog(@"currentThread---%@", [NSThread currentThread]); // 打印当前线程
NSLog(@"asyncSerial---begin");
dispatch_queue_t queue = dispatch_queue_create("me.chuquan.testQueue", DISPATCH_QUEUE_SERIAL);
dispatch_async(queue, ^{
// 追加任务1
for (int i = 0; i < 2; ++i) {
[NSThread sleepForTimeInterval:2]; // 模拟耗时操作
NSLog(@"1---%@", [NSThread currentThread]); // 打印当前线程
}
});
dispatch_async(queue, ^{
// 追加任务2
for (int i = 0; i < 2; ++i) {
[NSThread sleepForTimeInterval:2]; // 模拟耗时操作
NSLog(@"2---%@", [NSThread currentThread]); // 打印当前线程
}
});
dispatch_async(queue, ^{
// 追加任务3
for (int i = 0; i < 2; ++i) {
[NSThread sleepForTimeInterval:2]; // 模拟耗时操作
NSLog(@"3---%@", [NSThread currentThread]); // 打印当前线程
}
});
NSLog(@"asyncSerial---end");
}
|

上图所示为 异步任务 + 串行队列 的工作原理。
asyncSerial 被添加至主队列中,在主线程执行。- 异步任务被添加至串行队列,异步任务能开启新线程,但是串行队列不允许多任务,所以只能开启一条新线程。
asyncSerial 不会被异步任务阻塞。
执行结果 1
2
3
4
5
6
7
8
9
| currentThread---<NSThread: 0x600001ef5d00>{number = 1, name = main}
asyncSerial---begin
asyncSerial---end
1---<NSThread: 0x600001e5a740>{number = 3, name = (null)}
1---<NSThread: 0x600001e5a740>{number = 3, name = (null)}
2---<NSThread: 0x600001e5a740>{number = 3, name = (null)}
2---<NSThread: 0x600001e5a740>{number = 3, name = (null)}
3---<NSThread: 0x600001e5a740>{number = 3, name = (null)}
3---<NSThread: 0x600001e5a740>{number = 3, name = (null)}
|
同步任务 + 主队列
1
2
3
4
5
6
7
8
9
10
11
12
13
14
15
16
17
18
19
20
21
22
23
24
25
26
27
28
29
30
31
32
33
34
35
36
37
| /**
* 同步任务 + 主队列
* 特点(主线程调用):互等卡主不执行。
* 特点(其他线程调用):不会开启新线程,执行完一个任务,再执行下一个任务。
*/
- (void)syncMain {
NSLog(@"currentThread---%@", [NSThread currentThread]); // 打印当前线程
NSLog(@"syncMain---begin");
dispatch_queue_t queue = dispatch_get_main_queue();
dispatch_sync(queue, ^{
// 追加任务1
for (int i = 0; i < 2; ++i) {
[NSThread sleepForTimeInterval:2]; // 模拟耗时操作
NSLog(@"1---%@", [NSThread currentThread]); // 打印当前线程
}
});
dispatch_sync(queue, ^{
// 追加任务2
for (int i = 0; i < 2; ++i) {
[NSThread sleepForTimeInterval:2]; // 模拟耗时操作
NSLog(@"2---%@", [NSThread currentThread]); // 打印当前线程
}
});
dispatch_sync(queue, ^{
// 追加任务3
for (int i = 0; i < 2; ++i) {
[NSThread sleepForTimeInterval:2]; // 模拟耗时操作
NSLog(@"3---%@", [NSThread currentThread]); // 打印当前线程
}
});
NSLog(@"syncMain---end");
}
|

上图所示为 同步任务 + 主队列 的工作原理。
syncMain 被添加至主队列中,在主线程执行。- 同步任务被添加至主队列,同步任务不会开启新线程,且主队列(属于串行队列)中的任务只能在主线程执行。
syncMain 会被同步任务阻塞。但是需要注意的是
syncMain 和同步任务均在主队列中,同步任务需要等待
syncMain 执行完毕,因此产生死锁。
执行结果
对于这种情况,可以将 syncMain
放置新线程执行以避免产生死锁: 1
| [NSThread detachNewThreadSelector:@selector(syncMain) toTarget:self withObject:nil];
|
异步任务 + 主队列
1
2
3
4
5
6
7
8
9
10
11
12
13
14
15
16
17
18
19
20
21
22
23
24
25
26
27
28
29
30
31
32
33
34
35
36
| /**
* 异步任务 + 主队列
* 特点:只在主线程中执行任务,执行完一个任务,再执行下一个任务
*/
- (void)asyncMain {
NSLog(@"currentThread---%@", [NSThread currentThread]); // 打印当前线程
NSLog(@"asyncMain---begin");
dispatch_queue_t queue = dispatch_get_main_queue();
dispatch_async(queue, ^{
// 追加任务1
for (int i = 0; i < 2; ++i) {
[NSThread sleepForTimeInterval:2]; // 模拟耗时操作
NSLog(@"1---%@", [NSThread currentThread]); // 打印当前线程
}
});
dispatch_async(queue, ^{
// 追加任务2
for (int i = 0; i < 2; ++i) {
[NSThread sleepForTimeInterval:2]; // 模拟耗时操作
NSLog(@"2---%@", [NSThread currentThread]); // 打印当前线程
}
});
dispatch_async(queue, ^{
// 追加任务3
for (int i = 0; i < 2; ++i) {
[NSThread sleepForTimeInterval:2]; // 模拟耗时操作
NSLog(@"3---%@", [NSThread currentThread]); // 打印当前线程
}
});
NSLog(@"asyncMain---end");
}
|

上图所示为 异步任务 + 主队列 的工作原理。
asyncMain 被添加至主队列中,在主线程执行。- 异步任务被添加至主队列,异步任务能开启新线程,但是主队列(属于串行队列)中的任务只能在主线程执行。
asyncMain 不会被异步任务阻塞。
执行结果 1
2
3
4
5
6
7
8
9
| currentThread---<NSThread: 0x6000014d3700>{number = 1, name = main}
asyncMain---begin
asyncMain---end
1---<NSThread: 0x6000014d3700>{number = 1, name = main}
1---<NSThread: 0x6000014d3700>{number = 1, name = main}
2---<NSThread: 0x6000014d3700>{number = 1, name = main}
2---<NSThread: 0x6000014d3700>{number = 1, name = main}
3---<NSThread: 0x6000014d3700>{number = 1, name = main}
3---<NSThread: 0x6000014d3700>{number = 1, name = main}
|
GCD 应用
线程间通信
1
2
3
4
5
6
7
8
9
10
11
12
13
14
15
16
17
18
19
20
21
22
23
24
| /**
* 线程间通信
*/
- (void)communication {
// 获取全局并发队列
dispatch_queue_t queue = dispatch_get_global_queue(DISPATCH_QUEUE_PRIORITY_DEFAULT, 0);
// 获取主队列
dispatch_queue_t mainQueue = dispatch_get_main_queue();
dispatch_async(queue, ^{
// 异步追加任务
for (int i = 0; i < 2; ++i) {
[NSThread sleepForTimeInterval:2]; // 模拟耗时操作
NSLog(@"1---%@", [NSThread currentThread]); // 打印当前线程
}
// 回到主线程
dispatch_async(mainQueue, ^{
// 追加在主线程中执行的任务
[NSThread sleepForTimeInterval:2]; // 模拟耗时操作
NSLog(@"2---%@", [NSThread currentThread]); // 打印当前线程
});
});
}
|

上图所示为线程间通信的工作原理。
communication 被添加至主队列中,在主线程执行。- 异步任务被添加至全局队列(并行队列),异步任务能开启新线程,因此异步任务在新线程执行。
communication 不会被异步任务阻塞。- 当异步任务执行完成后,再将一个异步任务添加至主队列,主队列中的任务都在主线程执行,所以该异步任务在主线程执行。从而达到线程间通信的目的。
执行结果 1
2
3
| 1---<NSThread: 0x60000227ec80>{number = 3, name = (null)}
1---<NSThread: 0x60000227ec80>{number = 3, name = (null)}
2---<NSThread: 0x6000022ddd00>{number = 1, name = main}
|
参考
- iOS多线程:『GCD』详尽总结
- 细说GCD(Grand
Central Dispatch)如何用