
Chisel手册
Introduce
本文档是Chisel的手册(在Scala嵌入语言中构建硬件)。Chisel是嵌入在高级编程语言Scala中的硬件构造语言。单独的Chisel教程文档提供了使用Chisel的简单介绍,建议首先阅读。本手册提供了Chisel语言的全面概述和规范,它只是一组特殊的类定义,预定义对象和Scala中的使用约定。当你写一个Chisel程序时,你实际上是在写一个Scala程序。在本手册中,我们假设您已经了解了Scala的基础知识。如果你不熟悉Scala,我们建议你参考一本优秀的Scala书。
Nodes
Chisel中任何硬件设计最终都由节点对象的图表表示。Chisel中的用户代码生成此节点图,然后将其传递到Chisel后端以转换为Verilog或C
++代码。节点定义如下:
1
2
3
4
5
6
7
8
9
10
11
12
13
14
15
16
17
18
19
20
class Node {
// name assigned by user or from introspection var name: String = ""
// incoming graph edges
def inputs: ArrayBuffer[Node]
// outgoing graph edges
def consumers: ArrayBuffer[Node]
// node specific width inference
def inferWidth: Int
// get width immediately inferrable
def getWidth: Int
// get first raw node
def getRawNode: Node
// convert to raw bits
def toBits: Bits
// convert to raw bits
def fromBits(x: Bits): this.type
// return lit value if inferrable else null def litOf: Lit
// return value of lit if litOf is non null
def litValue(default: BigInt = BigInt(-1)): BigInt
}
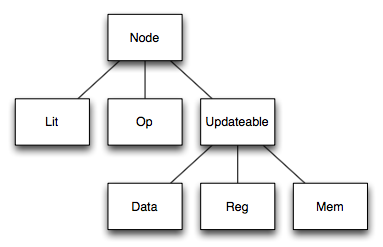
节点类层次结构的最高级别如图所示。基本类别是:
- Lit: 常量或文本
- Op: 逻辑或算术操作
- Updateable: 条件更新节点
- Data: 具有类型的wire或port
- Reg: 上升沿触发的寄存器
- Mem: 存储
Lits
原始文本表示为Lit节点,定义如下:
1
2
3
4
class Lit extends Node {
// original value
val inputVal: BigInt
}
原始文本包含位的集合。用户不直接创建原始文本,而是使用第Type节中定义的类型构造函数。
Ops
原始操作表示为如下定义的Op节点:
1
2
3
4
class Op extends Node {
// op name used during emission
val op: String
}
Ops计算其输入的组合函数。
Types
表示硬件设计的Chisel图包含原始节点和类型节点。Chisel类型系统与底层Scala类型系统分开维护,因此类型节点散布在原始节点之间,以允许Chisel检查并响应Chisel类型。Chisel类型节点在硬件设计转换为C ++或Verilog之前被擦除。getRawNode运算符定义在基本Node类中,跳过类型节点并返回找到的第一个原始节点。下图显示了内置的Chisel类型层次结构,其中Data为最顶层节点。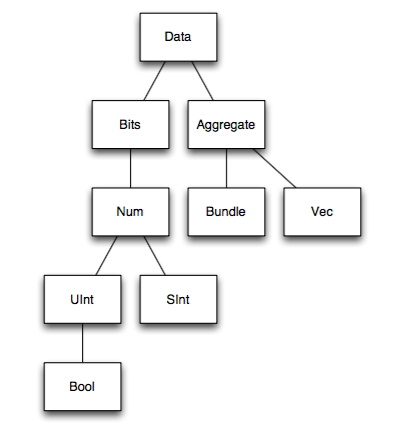
内置标量类型包括Bool,SInt和UInt和内置聚合类型Bundle和Vec允许用户使用其他类型的集合扩展Chisel数据类型集。
Data自身就是一个节点:
1
2
3
4
5
6
7
8
9
10
11
12
13
14
15
16
17
18
19
20
21
22
23
abstract class Data extends Node {
override def cloneType(): this.type =
this.getClass.newInstance.asInstanceOf[this.type]
// simple conversions
def toSInt: SInt
def toUInt: UInt
def toBool: Bool
def toBits: Bits
// flatten out to leaves of tree
def flatten: Array[(String, Data)]
// port direction if leaf
def dir: PortDir
// change dir to OUTPUT
def asOutput: this.type
// change dir to INPUT
def asInput: this.type
// change polarity of dir
def flip: this.type
// assign to input
def :=[T <: Data](t: T)
// bulk assign to input
def <>(t: Data)
}
Data类具有用于在类型之间转换和将端口方法委托给其单个输入的方法。我们将在Port一节讨论端口。最后,用户可以在其自己的类型节点(例如bundle)中覆盖cloneType方法,以便反映克隆所需的构造参数。
Data节点可以用于四种目的:
- types: UInt(width = 8),
在指定最小位宽的图中记录中间类型(在本节中描述)
- wires: UInt(width = 8),
作为数据的前向声明,允许将来的条件更新(在Updateable一节中描述)
- ports: UInt(dir = OUTPUT, width = 8),
定义模块接口的专用线,还能指定方向(在Ports一节中描述)
- literals: UInt(1) 或 UInt(1, 8), 可以使类型对象构造函数来构造其值和可选宽度。
Bits
在Chisel中,位的原始集合如下Bits类型定义所示:
1
2
3
4
5
6
7
8
9
10
11
12
13
14
15
16
17
18
19
20
21
22
23
24
25
26
27
28
29
30
31
32
33
34
35
36
37
38
39
40
41
42
43
44
object Bits {
def apply(dir: PortDir = null, width: Int = -1): Bits
// create literal from BigInt or Int
def apply(value: BigInt, width: Int = -1): Bits
// create literal from String using
// base_char digit+ string format
def apply(value: String, width: Int = -1): Bits
}
class Bits extends Data with Updateable {
// bitwise-not
def unary_~(): Bits
// bitwise-and
def & (b: Bits): Bits
// bitwise-or
def | (b: Bits): Bits
// bitwise-xor
def ^ (b: Bits): Bits
// and-reduction
def andR(): Bool
// or-reduction
def orR(): Bool
// xor-reduction def xorR(): Bool
// logical NOT
def unary_!(): Bool
// logical AND
def && (b: Bool): Bool
// logical OR
def || (b: Bool): Bool
// equality
def ===(b: Bits): Bool
// inequality
def != (b: Bits): Bool
// logical left shift
def << (b: UInt): Bits
// logical right shift
def >> (b: UInt): Bits
// concatenate
def ## (b: Bits): Bits
// extract single bit, LSB is 0
def apply(x: Int): Bits
// extract bit field from end to start bit pos
def apply(hi: Int, lo: Int): Bits
}
def Cat[T <: Data](elt: T, elts: T*): Bits
Bits具有用于简单位操作的方法。注意,##是二进制连接,而Cat是一个正则拼接。为了避免与Scala的内置==冲突,Chisel的按位比较命名为===。
使用Fill可以创建n位宽的域:
1
def Fill(n: Int, field: Bits): Bits
一个两输入的选择器可以使用Mux:
1
def Mux[T <: Data](sel: Bits, cons: T, alt: T): T
常量或字面值使用Scala整数或传递给构造函数的字符串表示:
1
2
3
4UInt(1)
UInt("ha")
UInt("o12")
UInt("b1010") // binary 4-bit lit from string.
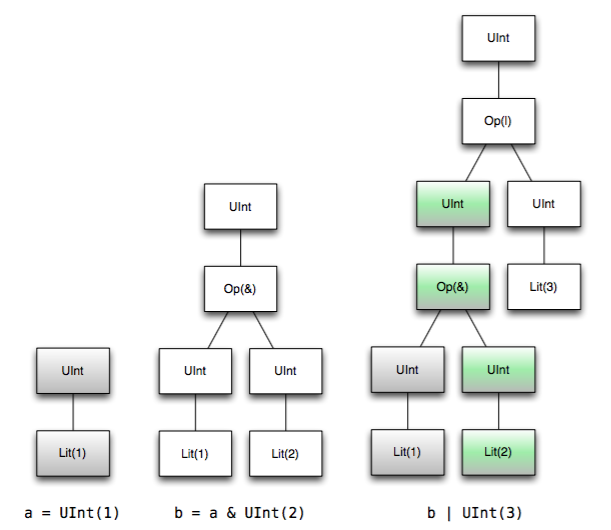
操作返回一个实际的操作符节点和类型节点组合成输入类型节点。参见上图,了解更复杂的例子。
Bools
布尔值用Bools表示:
1
2
3
4
5
6
object Bool {
def apply(dir: PortDir = null): Bool
// create literal
def apply(value: Boolean): Bool
}
class Bool extends UInt
Bool与UInt(width = 1)相等。
Nums
Num是一个类型节点,定义了算术运算:
1
2
3
4
5
6
7
8
9
10
11
12
13
14
15
16
17
18
class Num extends Bits {
// Negation
def unary_-(): Bits
// Addition
def +(b: Num): Num
// Subtraction
def -(b: Num): Num
// Multiplication
def *(b: Num): Num
// Greater than
def >(b: Num): Bool
// Less than
def <(b: Num): Bool
// Less than or equal
def <=(b: Num): Bool
// Greater than or equal
def >=(b: Num): Bool
}
有符号和无符号整数被认为是定点数的子集,并且分别由类型SInt和UInt表示:
1
2
3
4
5
6
7
8
9
10
11
12
13
14
15
16
object SInt {
def apply (dir: PortDir = null, width: Int = -1): SInt
// create literal
def apply (value: BigInt, width: Int = -1): SInt
def apply (value: String, width: Int = -1): SInt
}
class SInt extends Num object UInt {
def apply(dir: PortDir = null, width: Int = -1): UInt
// create literal
def apply(value: BigInt, width: Int = -1): UInt
def apply(value: String, width: Int = -1): UInt
}
class UInt extends Num {
// arithmetic right shift override
def >> (b: UInt): SInt
}
Bundles
Bundle将几种不同类型的命名字段组合成一个连续单元,非常像C中的struct:
1
2
3
4
class Bundle extends Data {
// shallow named bundle elements
def elements: ArrayBuffer[(String, Data)]
}
使用elements方法可以获取Bundle中每个元素的名称和类型,flatten方法返回嵌套聚合的叶子处的元素。
用户可以通过对bundle进行子类化来定义新的bundle,如下所示:
1
2
3
4
5
class MyFloat extends Bundle {
val sign = Bool()
val exponent = UInt(width = 8)
val significand = UInt(width = 23)
}
元素通过Scala字段访问:
1
2
val x = new MyFloat()
val xs = x.sign
当使用C++或Verilog后端发送时,bundle的元素的名称是从它们的bundle字段名获取的,使用Scala内省。
Vecs
Vecs可以创建可索引元素向量:
1
2
3
4
5
6
7
8
9
10
11
12
13
14
15
16
17
object Vec {
def apply[T <: Data](elts: Seq[T]): Vec[T]
def apply[T <: Data](elt0: T, elts: T*): Vec[T]
def fill[T <: Data](n: Int) (gen: => T): Vec[T]
def tabulate[T <: Data](n: Int)(gen: (Int) => T): Vec[T]
def tabulate[T <: Data](n1: Int, n2: Int) (gen: (Int, Int) => T): Vec[Vec[T]]
}
class Vec[T <: Data](n: Int, val gen: () => T) extends Data {
def apply(idx: UInt): T
def apply(idx: Int): T
def forall(p: T => Bool): Bool
def exists(p: T => Bool): Bool
def contains[T <: Bits](x: T): Bool
def count(p: T => Bool): UInt
def indexWhere(p: T => Bool): UInt
def lastIndexWhere(p: T => Bool): UInt
}
其中n个元素类型由gen定义。用户可以使用Int索引静态访问元素或使用UInt索引动态访问元素,其中动态访问创建一个虚拟类型节点(表示读取“端口”),该节点使用给定地址记录读取。在任一情况下,用户可以连线到读取的结果如下:
1
v(a) := d
只读存储器可以使用Vecs来表示:
1
2
val rom = Vec(UInt(3), UInt(7), UInt(4), UInt(0)) { UInt(width=3) }
val dout = rom(addr)
Bit Width Inference
用户需要设置端口和寄存器的位宽度,否则节点上的位宽度会自动推断,除非用户手动设置(使用Extract或Cat)。位宽推理引擎从图的输入端口开始,并根据以下规则集从它们各自的输入位宽度计算节点输出位宽度:
其中例如wz是线z的位宽度,并且&规则应用于所有按位逻辑运算。
位宽推理过程继续,直到没有位宽改变。除了固定位数的右移之外,位宽度推断规则规定输出位宽不能小于输入位宽度,因此,输出位宽度增长或保持相同。此外,寄存器的宽度必须由用户明确地或从复位值的位宽指定。从这两个要求,我们可以知道位宽推理过程将收敛到一个固定点。
Updateables
当描述线和状态节点的操作时,将规范作为输出值的一系列条件更新并且跨多个单独的语句分布这些更新通常是有用的。例如,可以立即引用数据节点的输出,但可以稍后设置其输入。可更新表示一个条件可更新节点,其累积对节点的访问,并且其稍后可以生成多路复用器以在电路中组合这些访问。
1
2
3
4
5
6
7
8
9
abstract class Updateable extends Node {
// conditional reads
def reads: Queue[(Bool, UInt)]
// conditional writes
def writes: Queue[(Bool, UInt, Node)]
// gen mux integrating all conditional writes
def genMuxes(default: Node)
override def := (x: Node): this.type
}
Chisel以when的形式提供条件更新规则,以支持这种顺序逻辑描述的风格:
1
2
3
4
5
6
7
object when {
def apply(cond: Bool)(block: => Unit): when
}
class when (prevCond: Bool) {
def elsewhen (cond: Bool)(block: => Unit): when
def otherwise (block: => Unit): Unit
}
when操作具有动态作用域的全局条件堆栈。因此,when创建一个在条件函数调用中有效的新条件。例如:
1
2
3
4
5
6
7
8
9
def updateWhen (c: Bool, d: Data) =
when (c) { r := d }
when (a) {
updateWhen(b, x)
}
// the same as
when (a) {
when (b) { r := x }
}
Chisel为其他常见形式的条件更新提供了一些语法糖:
1
2
3
4
def unless(c: Bool)(block: => Unit) =
when (!c) { block )
def otherwise(block: => Unit) =
when (Bool(true)) { block }
我们再介绍用于条件更新的switch语句,其涉及对一个公共密钥的一系列比较:
1
2
def switch(c: UInt)(block: => Unit): Unit
def is(v: Bool)(block: => Unit)
Forward Declaration
纯组合电路不允许在节点之间有循环,如果检测到这样的循环,则Chisel将报告错误。因为它们不具有周期,所以可以总是以前馈方式构建法向组合电路,通过添加其输入从已经定义的节点导出的新节点。
时序电路在节点之间具有反馈,因此有时需要在生成节点被定义之前参考输出线。因为Scala按顺序执行程序语句,所以我们允许数据节点用作提供节点声明的线,可:
1
2
3
4
5
6
7
val pcPlus4 = UInt()
val brTarget = UInt()
val pcNext = Mux(pcSel, brTarget, pcPlus4)
val pcReg = RegUpdate(pcNext)
pcPlus4 := pcReg + UInt(4)
...
brTarget := addOut
接线操作符:=用于在pcReg和addOut定义之后进行连接。在所有赋值完成后,如果前向声明未分配,则是一个错误。...
Regs
Chisel支持的状态元素的最简单形式是一个正边沿触发寄存器,定义如下:
1
2
3
4
5
6
7
8
9
10
object Reg {
def apply[T <: Data] (data: T, next: T = null, init: T = null): T
}
object RegNext {
def apply[T <: Data] (next: T, init: T = null): T
}
object RegInit {
def apply[T <: Data] (init: T): T
}
class Reg extends Updateable
1
2
3
4
val r1 = RegUpdate(io.in)
val r2 = RegReset(UInt(1, 8))
val r3 = RegUpdate(io.in, UInt(1))
val r4 = Reg(UInt(width = 8))
其中resetVal是reset为ture时用于寄存器的值。
Mems
Chisel通过Mem结构支持随机存取存储器。写入Mem是正边沿触发,读取是组合或正边沿触发。
1
2
3
4
5
6
7
object Mem {
def apply[T <: Data](depth: Int, gen: => T, seqRead: Boolean = false): Mem
}
class Mem[T <: Data](gen: () => T, depth: Int, seqRead: Boolean = false)
extends Updateable {
def apply(idx: UInt): T
}
通过应用UInt索引创建到Mems的端口。具有一个写入端口和两个组合读取端口的32个条目的寄存器文件可以表示如下:
1
2
3
4
val rf = Mem(32, UInt(width = 64))
when (wen) { rf(waddr) := wdata }
val dout1 = rf(waddr1)
val dout2 = rf(waddr2)
如果设置了可选参数seqRead,当Reg分配了Mem的输出时,Chisel将尝试推断顺序读端口。单读,单写SRAM可以描述如下:
1
2
3
4
val ram1r1w = Mem(1024, UInt(width = 32), seqRead = true)
val dout = Reg(UInt())
when (wen) { ram1r1w(waddr) := wdata }
when (ren) { dout := ram1r1w(raddr) }
单端口SRAM可以在读和写条件在链中相同时相互排斥时推断:
1
2
3
4
5
val ram1p =
Mem(1024, UInt(width = 32), seqRead = true)
val dout = Reg(UInt())
when (wen) { ram1p(waddr) := wdata }
.elsewhen (ren) { dout := ram1p(raddr) }
如果相同的Mem地址在相同的时钟沿上被写入和顺序读取,或者如果顺序读取使能被清除,则读取数据是实现定义的。
Mem还支持子字写入的写掩码。如果相应的屏蔽位置1,则写入给定位。
1
2
val ram = Mem(256, UInt(width = 32))
when (wen) { ram.write(waddr, wdata, wmask) }
Ports
端口是用作硬件模块接口的Data派生节点。端口是原始Data对象的定向版本。端口方向定义如下:
1
2
3
trait PortDir
object INPUT extends PortDir
object OUTPUT extends PortDir
聚合端口可以使用vec或bundle的实例作为叶子递归构造。
Modules
在Chisel中,module与Verilog中的module非常相似,在生成电路中定义了层次结构。分层模块命名空间可在下游工具中访问,以帮助调试和物理布局。用户定义的模块被定义为一个类:
- 继承自Module
- 包含一个接口Bundle,其存储在一个名为io的域中
- 在其构造器中将子电路连接起来
用户通过子类化Module来编写自己的模块,其定义如下:
1
2
3
4
5
6
abstract class Module {
val io: Bundle
var name: String = ""
def compileV: Unit
def compileC: Unit
}
并定义自己的io字段。例如,要定义一个两输入多路复用器,我们将定义一个模块如下:
1
2
3
4
5
6
7
8
9
class Mux2 extends Module {
val io = new Bundle{
val sel = Bool(INPUT)
val in0 = Bool(INPUT)
val in1 = Bool(INPUT)
val out = Bool(OUTPUT)
}
io.out := (io.sel & io.in1) | (~io.sel & io.in0)
}
:=赋值运算符,在模块定义的主体中使用,是Chisel中的一个特殊运算符,它将左侧的输入连接到右侧的输出。它通常用于将输出端口连接到其定义。
<>操作符批量连接父对象模型之间的对等相反接口或父/子模块之间相同的接口。批量连接使用路径名匹配连接叶子端口。仅当其中一个端口非空时允许连接,从而允许用户重复地批量连接部分填充的接口。在所有连接完成并且电路正在精心设计后,Chisel警告用户端口是否只有一个到它们的连接。
当使用C++或Verilog后端发送时,存储在模块中的节点和子模块的名称可以使用Scala内省从它们的模块字段名称中获取。使用函数setName()设置节点或子模块的名称。
Black Box
黑盒允许用户定义接口到Chisel之外定义的电路。用户定义:
- 一个BlackBox子类的模块
- 一个带有接口的io
- 可选的VerilogParameters子类
例如,可以将简单的ROM黑盒定义为:
1
2
3
4
5
6
7
8
9
10
11
12
13
14
15
16
17
18
19
class RomIo extends Bundle {
val isVal = Bool(INPUT)
val raddr = UInt(INPUT, 32)
val rdata = UInt(OUTPUT, 32)
raddr.setName("RADDR")
}
class RomParams extends VerilogParameters {
val MY_STR = "Test"
val MY_INT = 5
}
class Rom extends BlackBox {
val io = new RomIo()
val romParams = new RomParams()
setVerilogParameters(romParams)
renameClock(Driver.implicitClock, "clock_A")
renameClock("my_other_clock", "test_clock")
renameReset("rst")
// Define how to use in simulation here
}
参数将转换为verilog参数,其中包含类定义中使用的名称和值。setVerilogParameters也可以直接接受一个字符串。函数renameClock可以获取Clock对象或时钟的字符串名称来重命名BlackBox输出时钟。函数renameReset将重命名隐式重置。如果需要命名其他重置,请调用setName()。在io类中显示了使用setName()的示例。而不是被称为io_raddr为黑箱的io,它将是RADDR。黑盒在c模拟中作为一个模块。这意味着您可以使用io实现BlackBox的功能,以便您可以验证您的设计。
Printf & Sprintf
Chisel提供了为调试目的格式化和打印字符串的能力。printf和sprintf结构与它们的C名称类似:它们取一个格式字符串和可变数量的参数,然后分别打印或返回一个字符串。在模拟期间,printf在上升时钟沿将控制字符串打印到控制台。另一方面,sprintf返回格式化的字符串作为位向量。
支持的格式说明符是%b(二进制数),%d(十进制数),%x(十六进制数)和%s(由8位扩展ASCII字符序列组成的字符串)。%%指定文字%。)与C不同,没有宽度修饰符:相应参数的位宽决定了字符串表示中的宽度。
以下示例在c为true时打印“0x4142 16706 AB”行:
1
2
3
val x = Bits(0x4142)
val s1 = sprintf("%x %s", x, x);
when (c) { printf("%d %s\n", x, s1); }
Assert
运行时断言由assert结构提供。在仿真期间,如果断言的论点在上升时钟边沿为false,则会打印错误并终止仿真。例如,以下将在十个时钟周期后终止仿真:
1
2
3
val x = Reg(init = UInt(0, 4))
x := x + UInt(1)
assert(x < UInt(10))
Main & Testing
为了构造一个电路,用户从它们的顶层main函数调用chiselMain:
1
2
3
4
object chiselMain {
def apply[T <: Module]
(args: Array[String], comp: () => T): T
}
运行以上对象会在--targetDir dir_name参数指定的目录下生成module_name.cpp和module_name.h C++文件。
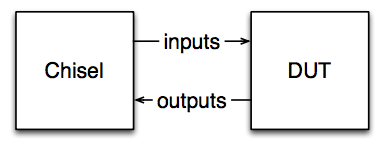
测试是电路设计的一个关键部分,因此在Chisel中,我们提供了一种测试电路的机制,通过使用Tester类的子类在Scala中提供测试向量:
1
2
3
4
5
6
7
8
9
10
11
12
13
14
15
16
17
18
class Tester[T <: Module] (val c: T, val isTrace: Boolean = true) {
var t: Int
var ok: Boolean
val rnd: Random
def int(x: Boolean): BigInt
def int(x: Int): BigInt
def int(x: Bits): BigInt
def reset(n: Int = 1)
def step(n: Int): Int
def pokeAt(data: Mem[T], index: Int, x: BigInt)
def poke(data: Bits, x: BigInt)
def poke(data: Aggregate, x: Array[BigInt])
def peekAt(data: Mem[T], index: Int)
def peek(data: Bits): BigInt
def peek(data: Aggregate): Array[BigInt]
def expect (good: Boolean, msg: String): Boolean
def expect (data: Bits, target: BigInt): Boolean
}
它将tester绑定到模块,并允许用户使用给定的调试协议编写测试。用户利用:
- poke: 设置端口和状态值
- step: 以一个时间单位执行电路
- peek: 读端口和状态值
- expect: 比较测试电路的值和预期的值
用户通过如下方式连接tester实例和模块:
1
2
3
4
5
object chiselMainTest {
def apply[T <: Module]
(args: Array[String], comp: () => T)(
tester: T => Tester[T]): T
}
如下所示:
1
2
3
4
5
6
7
8
9
10
11
12
13
14
class Mux2Tests(c: Mux2) extends Tester(c) {
val n = pow(2, 3).toInt
for (s <- 0 until 2) {
for (i0 <- 0 until 2) {
for (i1 <- 0 until 2) {
poke(c.io.sel, s)
poke(c.io.in1, i1)
poke(c.io.in0, i0)
step(1)
expect(c.io.out, (if (s == 1) i1 else i0))
}
}
}
}
使用poke将Mux2的每个输入的分配设置为适当的值。对于这个特定的例子,我们通过将输入硬编码到一些已知的值并检查输出是否对应于已知的值来测试Mux2。为此,在每次迭代中,我们生成模块的适当输入,并告诉模拟将这些值分配给我们正在测试的器件的输入c,步骤电路和测试期望值。最后,下面显示了如何调用测试器:
1
2
3
chiselMainTest(args + "--test", () => new Mux2()){
c => new Mux2Tests(c)
}
最后,chiselMain*有以下命令参数:
> --targetDir 目标路径前缀
> --genHarness 生成C++文件 > --debug 把所有wire放入C++类文件中
> --compile 编译生成的C++ > --test 使用C++应用运行测试 >
--backend v 产生verilog > --backend c 产生C++(默认) > --vcd
使能vcd打印
C++ Emulator
C ++仿真器基于使用C ++模板的快速多字库。
单个字由val_t定义如下:
1
2
3
typedef uint64_t val_t;
typedef int64_t sval_t;
typedef uint32_t half_val_t;
多字由dat_t定义,如下所示:
1
2
3
4
5
6
7
8
9
10
11
12
13
14
15
16
17
18
19
20
21
22
23
24
25
26
27
28
29
30
31
32
33
34
35
36
37
38
39
40
41
42
43
44
45
46
47
48
49
50
51
52
53
54
55
56
57
58
59
60
61
62
63
64
65
66
67
68
69
70
71
72
73
74
75
76
77
78
79
80
81
template <int w>
class dat_t {
public:
const static int n_words;
inline int width ( void );
inline int n_words_of ( void );
inline bool to_bool ( void );
inline val_t lo_word ( void );
inline unsigned long to_ulong ( void );
std::string to_str ();
dat_t<w> ();
template <int sw>
dat_t<w> (const dat_t<sw>& src);
dat_t<w> (const dat_t<w>& src);
dat_t<w> (val_t val);
template <int sw>
dat_t<w> mask(dat_t<sw> fill, int n);
template <int dw>
dat_t<dw> mask(int n);
template <int n>
dat_t<n> mask(void);
dat_t<w> operator + ( dat_t<w> o );
dat_t<w> operator - ( dat_t<w> o );
dat_t<w> operator - ( );
dat_t<w+w> operator * ( dat_t<w> o );
dat_t<w+w> fix_times_fix( dat_t<w> o );
dat_t<w+w> ufix_times_fix( dat_t<w> o );
dat_t<w+w> fix_times_ufix( dat_t<w> o );
dat_t<1> operator < ( dat_t<w> o );
dat_t<1> operator > ( dat_t<w> o );
dat_t<1> operator >= ( dat_t<w> o );
dat_t<1> operator <= ( dat_t<w> o );
dat_t<1> gt ( dat_t<w> o );
dat_t<1> gte ( dat_t<w> o );
dat_t<1> lt ( dat_t<w> o );
dat_t<1> lte ( dat_t<w> o );
dat_t<w> operator ^ ( dat_t<w> o );
dat_t<w> operator & ( dat_t<w> o );
dat_t<w> operator | ( dat_t<w> o );
dat_t<w> operator ~ ( void);
dat_t<1> operator ! ( void );
dat_t<1> operator && ( dat_t<1> o );
dat_t<1> operator || ( dat_t<1> o );
dat_t<1> operator == ( dat_t<w> o );
dat_t<1> operator == ( datz_t<w> o );
dat_t<1> operator != ( dat_t<w> o );
dat_t<w> operator << ( int amount );
dat_t<w> operator << ( dat_t<w> o );
dat_t<w> operator >> ( int amount );
dat_t<w> operator >> ( dat_t<w> o );
dat_t<w> rsha ( dat_t<w> o);
dat_t<w>& operator = ( dat_t<w> o );
dat_t<w> fill_bit(val_t bit);
dat_t<w> fill_byte(val_t byte, int nb, int n);
template <int dw, int n>
dat_t<dw> fill( void );
template <int dw, int nw>
dat_t<dw> fill( dat_t<nw> n );
template <int dw>
dat_t<dw> extract();
template <int dw>
dat_t<dw> extract(val_t e, val_t s);
template <int dw, int iwe, int iws>
dat_t<dw> extract(dat_t<iwe> e, dat_t<iws> s);
template <int sw>
dat_t<w> inject(dat_t<sw> src, val_t e, val_t s);
template <int sw, int iwe, int iws>
dat_t<w> inject (dat_t<sw> src, dat_t<iwe> e, dat_t<iws> s);
template <int dw>
dat_t<dw> log2();
dat_t<1> bit(val_t b);
val_t msb();
template <int iw>
dat_t<1> bit(dat_t<iw> b)
}
template <int w, int sw>
dat_t<w> DAT(dat_t<sw> dat);
template <int w>
dat_t<w> LIT(val_t value);
template <int w> dat_t<w>
mux ( dat_t<1> t, dat_t<w> c, dat_t<w> a )
其中w是位宽参数。
Chisel编译器将顶层模块编译为可以创建和执行的单个扁平的mod_t类:
1
2
3
4
5
6
7
8
9
10
11
12
13
14
15
class mod_t {
public:
// initialize module
virtual void init (void) { };
// compute all combinational logic
virtual void clock_lo (dat_t<1> reset) { };
// commit state updates
virtual void clock_hi (dat_t<1> reset) { };
// print printer specd node values to stdout
virtual void print (FILE* f) { };
// scan scanner specd node values from stdin
virtual bool scan (FILE* f) { return true; };
// dump vcd file
virtual void dump (FILE* f, int t) { };
};
Chisel编译器可以创建一个线束,或者用户可以自己写一个线束。以下是CPU模块的线束示例:
1
2
3
4
5
6
7
8
9
10
11
12
13
#include "cpu.h"
int main (int argc, char* argv[]) {
cpu_t* c = new cpu_t();
int lim = (argc > 1) ? atoi(argv[1]) : -1;
c->init();
for (int t = 0; lim < 0 || t < lim; t++) {
dat_t<1> reset = LIT<1>(t == 0);
if (!c->scan(stdin)) break;
c->clock_lo(reset);
c->clock_hi(reset);
c->print(stdout);
}
}
Verilog
当-v参数传递到chiselMain时,Chisel生成Verilog。
例如,从SBT,以下:
1
run --v
将在目标目录中生成名为module-name.v的单个Verilog文件。该文件将包含一个模块,每个模块定义为在chiselMain中创建的顶层模块的子模块。具有相同接口和主体的模块将被缓存和重用。
Multiple Clock Domains
Creating Clock domains
为了使用多个时钟域,用户必须创建多个时钟。在Chisel中,时钟是用复位信号参数创建的一级节点,并定义如下:
1
2
3
class Clock (reset: Bool) extends Node {
def reset: Bool // returns reset pin
}
在Chisel中有一个内置的隐式时钟,状态元素默认使用:
1
var implicitClock = new Clock( implicitReset )
状态元素和模块的时钟可以使用名为clock的附加命名参数来定义:
1
2
3Reg(... clock: Clock = implicitClock)
Mem(... clock: Clock = implicitClock)
Module(... clock: Clock = implicitClock)
Crossing Clock Domains
有两种方式可以定义电路在时钟域之间发送数据。第一种和最原始的方式是使用由两个寄存器组成的同步电路,如下所示:
1
2
3
4
5
6
7
// signalA is in clock domain clockA,
// want a version in clockB as signalB
val s1 = Reg(init = UInt(0), clock = clockB)
val s2 = Reg(init = UInt(0), clock = clockB)
s1 := signalA
s2 := s1;
signalB := s2
由于亚稳性问题,该技术限于在域之间传递一位数据。
在域之间发送数据的第二种更一般的方式是通过使用异步fifo:
1
2
class AsyncFifo[T<:Data](gen: T, entries: Int, enq_clk: Clock, deq_clock: Clock)
extends Module
然后,我们可以通过指定标准fifo参数和两个时钟,然后使用标准去耦就绪/有效信号,从时钟频率A到时钟B获得一个版本的signalA:
1
2
3
4
5
6
val fifo = new AsyncFifo(Uint(width = 32), 2, clockA, clockB)
fifo.io.enq.bits := signalA
signalB := fifo.io.deq.bits
fifo.io.enq.valid := condA
fifo.io.deq.ready := condB
...
Backend Specific Multiple Clock Domains
时钟域可以以域特定的方式映射到C++和Verilog后端。为了展示如何驱动多时钟设计,考虑硬件示例,其中两个模块使用AsyncFifo进行通信,每个模块在不同的时钟:fastClock和slowClock。
C++
在C ++后端,对于每个时钟i,有一个:
- uint64_t clk_i域表示时钟i的周期
- uint63_t clk_i_cnt域表示时钟i当前计数
- clock_lo_i和clock_hi_i
- int reset()函数,其保证了所有的clock_lo和clock_hi函数被立即调用
- int
clock(reset)函数,其计算最小增量,调用适当的clock_lo和clock_hi,并返回使用的最小增量。
为了建立C++模拟,用户需要:
- 将所有周期字段初始化为所需周期
- 将所有计数字段初始化为期望的相位
- 调用reset
- 重复调用时钟逐步模拟
以下是slowClock / fastClock的main函数C++示例:
1
2
3
4
5
6
7
8
9
10
11
12
13
int main(int argc, char** argv) {
ClkDomainTest_t dut; dut.init(1);
dut.clk = 2;
dut.clk_cnt = 1;
dut.fastClock = 4;
dut.fastClock_cnt = 0;
dut.slowClock = 6;
dut.slowClock_cnt = 0;
for (int i = 0; i < 12; i ++)
dut.reset();
for (int i = 0; i < 96; i ++)
dut.clock(LIT<1>(0));
}
Verilog
在verilog中,
- Chisel为每个时钟/复位创建一个新端口
- Chisel将所有时钟连接到顶部模块
- 用户必须为每个时钟i创建一个always块时钟驱动器
以下是驱动slowClock /
fastClock示例电路的顶层线束的Verilog示例:
1
2
3
4
5
6
7
8
9
10
11
12
13
14
15
16
17
18
19
20
21
module emulator;
reg fastClock = 0, slowClock = 0, resetFast = 1, resetSlow = 1;
wire [31:0] add, mul, test;
always #2 fastClock = ~fastClock;
always #4 slowClock = ~slowClock;
initial begin
#8
resetFast = 0;
resetSlow = 0;
#400
$finish;
end
ClkDomainTest dut (
.fastClock(fastClock),
.slowClock(slowClock),
.io_resetFast(resetFast),
.io_resetSlow(resetSlow),
.io_add(add),
.io_mul(mul),
.io_test(test));
endmodule
Extra Stuff
1 | def ListLookup[T <: Bits](addr: UInt, default: List[T], |
Standard Library
Math
1 | // Returns the log base 2 of the input |
Sequential
1 | // Returns the n-cycle delayed version |
UInt
1 | // Returns the number of bits set in the // input signal. Causes an exception if // the input is wider than 32 bits. |
Decoupled
1 | // Adds a ready-valid handshaking |
(完)